Digital Accessibility
Digital Accessibility
Independence Community College is committed to digital accessibility.
Accessible digital documents benefit all users by providing clear, concise, and easily understandable information. When you plan, format, and structure document content with accessibility in mind, you ensure usability for individuals with disabilities and those using different devices, software, and hardware.
Here, we provide general tips to ensure document accessibility, along with detailed guidelines for various document formats. Additionally, we offer a set of steps to minimize the number of inaccessible documents on your website.
- Create source documents with accessibility in mind from the beginning. This prevents rework and ensures efficiency.
- Keep the source document available. This is the document version from which a PDF originates, often Microsoft Word, PowerPoint, or Excel files. It’s much easier to remediate from the source document than from a PDF.
- Use a method that preserves accessibility when exporting to a PDF.
- Allocate extra time during the document creation and website posting process to address accessibility issues.
- Utilize accessibility checkers to evaluate your documents.
If you’re unsure where to start, here are three simple steps to significantly enhance the accessibility of almost any document:
- Ensure that your headings and subheadings have a semantic ‘heading style’ applied to them. Avoid using only bold or larger font sizes to indicate headings, as assistive technologies may not interpret them correctly. Refer to the instructions on how to set headings in Word.
- Review link text and ensure it is descriptive enough to provide clear information about the destination when it is read independently from the surrounding content. Avoid using generic terms like ‘read more’ or ‘here’ as link text. Refer to the instructions on how to create a more meaningful links in Word.
- Include alternative text for images. All images should have concise and descriptive alt text unless they are purely decorative and do not provide any relevant visual information. Strive to keep the descriptions brief. Refer to the instructions on how to set alt text in Word.
Word Documents
Here are some helpful resources and videos that offer guidance on enhancing accessibility in Microsoft Word.
PowerPoint Presentations
Creating presentations that are accessible benefits everyone, including those with disabilities, non-native speakers, individuals with diverse learning preferences, remote participants without visual aids, and even those seated at the back in a large venue.
Here are some helpful resources and videos that provide guidance on improving accessibility in PowerPoint.
Excel Spreadsheets
Here are some helpful resources and videos that offer guidance on enhancing accessibility in Microsoft Excel.
PDF Documents
PDFs are widely used across the University to share information, instructions, and records. When PDFs are not accessible, they can create barriers for people who use screen readers, keyboard navigation, or other assistive technologies.
This guide outlines practical steps, tools, and decision points to help you create, evaluate, and improve PDF accessibility.
In many cases, the most effective approach is to start with an accessible source document and make thoughtful choices before exporting to PDF.
Start with the experience you want to provide
Before working on accessibility fixes, take a step back and consider the document itself.
Ask yourself:
- What is the purpose of this document?
- Who needs to use it, and how?
- Is this information better delivered as a web page instead of a PDF?
In many cases, especially for frequently updated or high-use content, publishing information directly on the web is more accessible and easier to maintain than a PDF.
Understand the complexity of your document
Not all PDFs are equal. Complexity affects how much time, expertise, and tooling are required.
Simple documents may include
- Short, text-based documents
- Clear headings and lists
- Minimal images or simple tables
Complex documents may include
- Long reports
- Visual publications
- Complex tables, charts, or forms
- Scanned content
The more complex the document, the more likely it will require advanced remediation tools or professional support.
Start with an accessible source file
Whenever possible, accessibility should begin before a PDF is created.
If you have a source file (such as Word or PowerPoint):
- Make sure it follows basic accessibility best practices
- Run built-in accessibility checkers
- Fix issues before exporting to PDF
Starting with an accessible source document saves time, reduces errors, and produces higher-quality PDFs.
Export to a tagged PDF
When creating a PDF from Microsoft Applications like MS Word, the Save As method is recommended because it preserves structure and accessibility information.
Recommended steps
- Go to File → Save As
- Choose PDF as the file type
- Select Options
- Confirm that “Document structure tags for accessibility” is checked
This ensures headings, lists, and reading order are carried into the PDF.
You can also export using the Adobe Acrobat plugin in Word if it is installed. This method preserves headings, alt text, and tags during conversion.
Check accessibility in Adobe Acrobat Pro
After creating the PDF, open it in Adobe Acrobat Pro and run the built-in Accessibility Checker.
This tool helps identify common issues such as:
- Missing document titles
- Untagged content
- Incorrect heading order
- Missing alternative text
Automated checks are helpful—but they are not enough on their own.
Manual review and testing still matter
No automated tool can fully evaluate accessibility.
Manual checks and user testing help confirm:
- Logical reading order
- Meaningful headings
- Clear link text
- Usability with assistive technologies
Whenever possible, combine automated testing with human review.
Tools for creating and evaluating accessible PDFs
Authoring tools
- Microsoft Word, PowerPoint, and Excel – Create accessible source documents and export tagged PDFs when accessibility best practices are followed, such as using built-in headings, lists, tables, and alternative text.
- Adobe InDesign – Used for complex layouts and design-heavy documents. Creating accessible PDFs from InDesign requires additional setup, such as mapping paragraph styles to the correct PDF tags, defining reading order, and adding alternative text before export.
- Adobe Acrobat Pro– Edit existing PDFs, run accessibility checks, repair tags, adjust reading order, and fix common accessibility issues after export.
Many popular design and marketing tools—such as Canva —are not designed to support the creation of fully accessible documents or tagged PDFs. These tools may be suitable for print design, but they often lack the structural controls needed for digital accessibility. Documents created in these tools typically require significant remediation in Adobe Acrobat Pro or specialized tools before they can meet accessibility standards.
Understanding PDF tags
Tags provide the underlying structure that allows assistive technologies to interpret PDF content.
Tags define:
- Headings
- Paragraphs
- Lists
- Tables
- Reading order
Without proper tags, a PDF may appear visually correct but be unusable for screen reader users.
Learning how to view and adjust tags in Acrobat is an important step in PDF accessibility.
Key PDF accessibility terms
- PDF (Portable Document Format): A file format that preserves layout and appearance
- Tagged PDF: A PDF with structural and semantic information for assistive technologies
- Accessible PDF: A PDF that meets accessibility standards such as WCAG
- PDF/UA: An international standard for accessible PDF documents
Adobe InDesign
To make PDFs from InDesign more accessible, most of the work should be done in InDesign. This strategy cuts down on the remediation work needed in Acrobat Pro. If you have to edit something in InDesign, you won’t have to repeat all the remediation steps in Acrobat.
Accessibility basics include fundamental considerations, such as font legibility, good color contrast, meaningful link text, proper link formatting, the use of real lists instead of fake ones, and more.
Here, we provide specific strategies to make PDFs created in InDesign more accessible.
Steps in InDesign
Use Paragraph Styles
The benefit of using Paragraph Styles is not only accessibility but also consistency of formatting and efficiency. When you change the formatting of a style, all text to which the style has been applied will be updated with the new format.
You will be associating Paragraph Styles you use for your headings and other elements with proper PDF tags next.
Use headings to organize your document effectively
Headings play an important role in accessibility because they convey the structure of content. They benefit those who visually scan the headings and those who rely on screen readers to voice out existing headings.
Consider using a naming convention for paragraph styles that indicates the heading level.
H1 will usually be the title of your document. Follow the heading hierarchy (H1, H2, H3, H4…) without skipping levels. For example, don’t jump from H1 to H3. Text that doesn’t serve as a heading should not be marked as one.
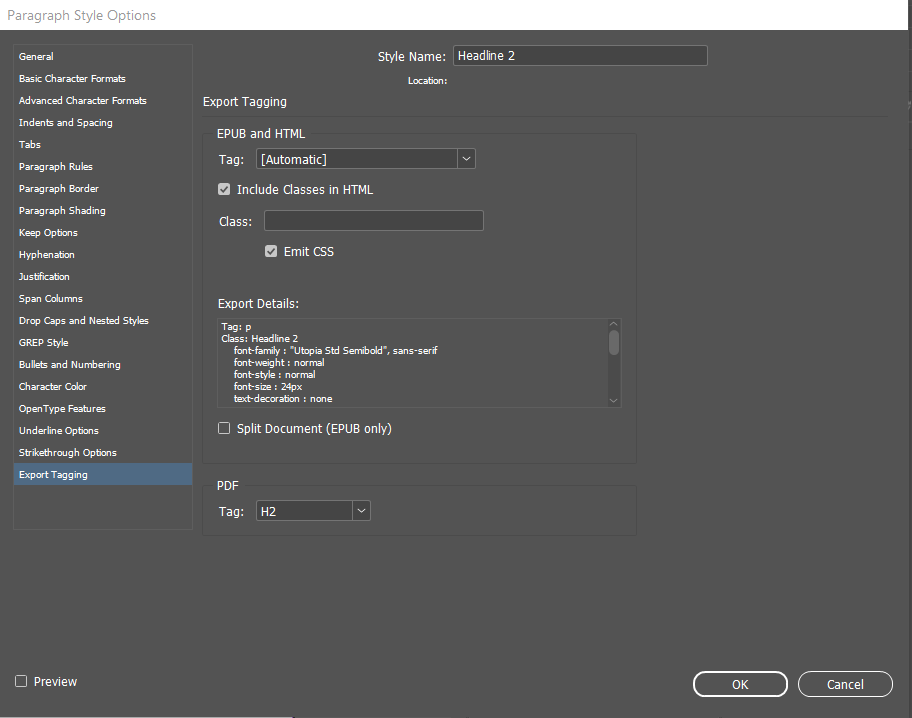
Map Paragraph Styles to PDF tags
Use Export Tagging to define how InDesign Paragraph Styles are tagged in PDF.
- Select a paragraph style
- Go to More Options
- Go to Style Options
- Select Export Tagging in a new window
- Under PDF, change default Tag: [Automatic] to correct tag (P, H1, H2… H6, Artifact)
- Click OK
You can also modify all the export tags in a single window:
- Go to More Options
- Edit All Export Tags
- Toggle Show to PDF
- Map each Style to a Tag
- Click OK
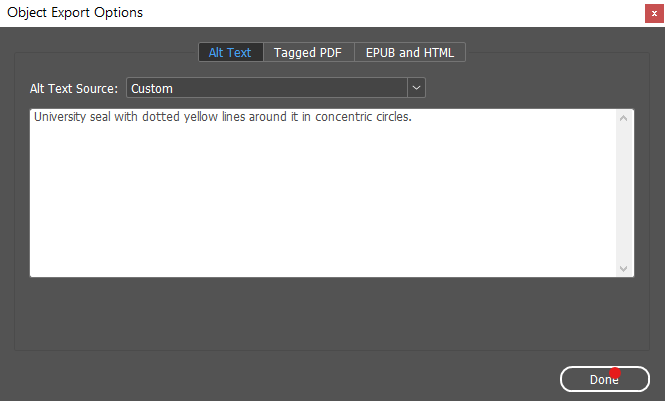
Add alternative text for images
If you add an image to your content, you must add alternative text to describe it because screen readers can’t read pictures.
- Select the image with the Selection tool
- Choose Object
- Select Object Export Options
- Select the Alt Text tab in the Object Export Options dialog
- Select Custom from the Alt Text Source menu
- Enter the description in the text field
- Click Done
Anchor images within the content
Select and hold the mouse on the anchor icon or the blue square at the top right of the image, then drag it to where you want the image in the document to be read. Release the mouse button. This will ensure appropriate reading order.
Use threaded text frames
For the correct flow of text use threaded text frames for continuous text, rather than disconnected text frames.
Designate header row in tables
- Go to Table
- Create Table
- Type the number of header rows
Avoid complex tables. Note that tables with multiple column headers or row headers require additional remediation in Acrobat Pro.
Establish content order in the Articles panel
The Articles panel lets you decide the order of content tags. This determines the order in which assistive technology will read content.
Drag and drop frames and objects into the panel to set the reading order. You can organize content into smaller articles too, without changing the page layout.
- Go to Window
- Select Articles
- Select the page objects: Press and hold the shift key, then click each object in the order you want them to appear, or select all at once and arrange them later in the Articles Panel.
- To add content to the Articles Panel, drag the selected objects into it and name the Article. A list of objects will then show up in the panel.
- Repeat for each page!
Specify document title
To add a title:
- Go to File
- Select File Info
- Type in a Document Title
Consider adding more metadata to make the document easier to find.
Incorporate various navigation mechanisms
Add to your file contents tables, bookmarks, hyperlinks, and cross-references to help users navigate to specific content. This makes it easier for a screen reader user to move through the document.
Export as PDF with settings optimized for accessibility
If the primary purpose is the web:
- Go to File
- Go to Export
- Select Format: Adobe PDF (Interactive)
- Save
- Check Create Tagged PDF and Use Structure for Tab Order
- Select OK
If the document is for print and web:
- Go to File
- Go to Export
- Go to Format: Adobe PDF (Print)
- Save
- Set compatibility to Acrobat 6 (PDF 1.5) or higher.
- Select Create tagged PDF, Bookmarks, and Hyperlinks,
- Select OK
Steps in Acrobat Pro
- Set the language in Document Properties
- Change display name from Filename to Document Title
- Set the tab order to use the document structure in the Page Thumbnails pane
- Run the Acrobat accessibility check
- Run the PAC accessibility check